Heads up! To view this whole video, sign in with your Courses account or enroll in your free 7-day trial. Sign In Enroll
Preview
Start a free Courses trial
to watch this video
Balsamiq is a tool built specifically for wireframing. It contains UI elements and devices that can easily be inserted as building blocks for your wireframe.
Wireframing tool used in this stage:
- Balsamiq Cloud: Visit Treehouse Perks for information on how to get a 90-day free trial.
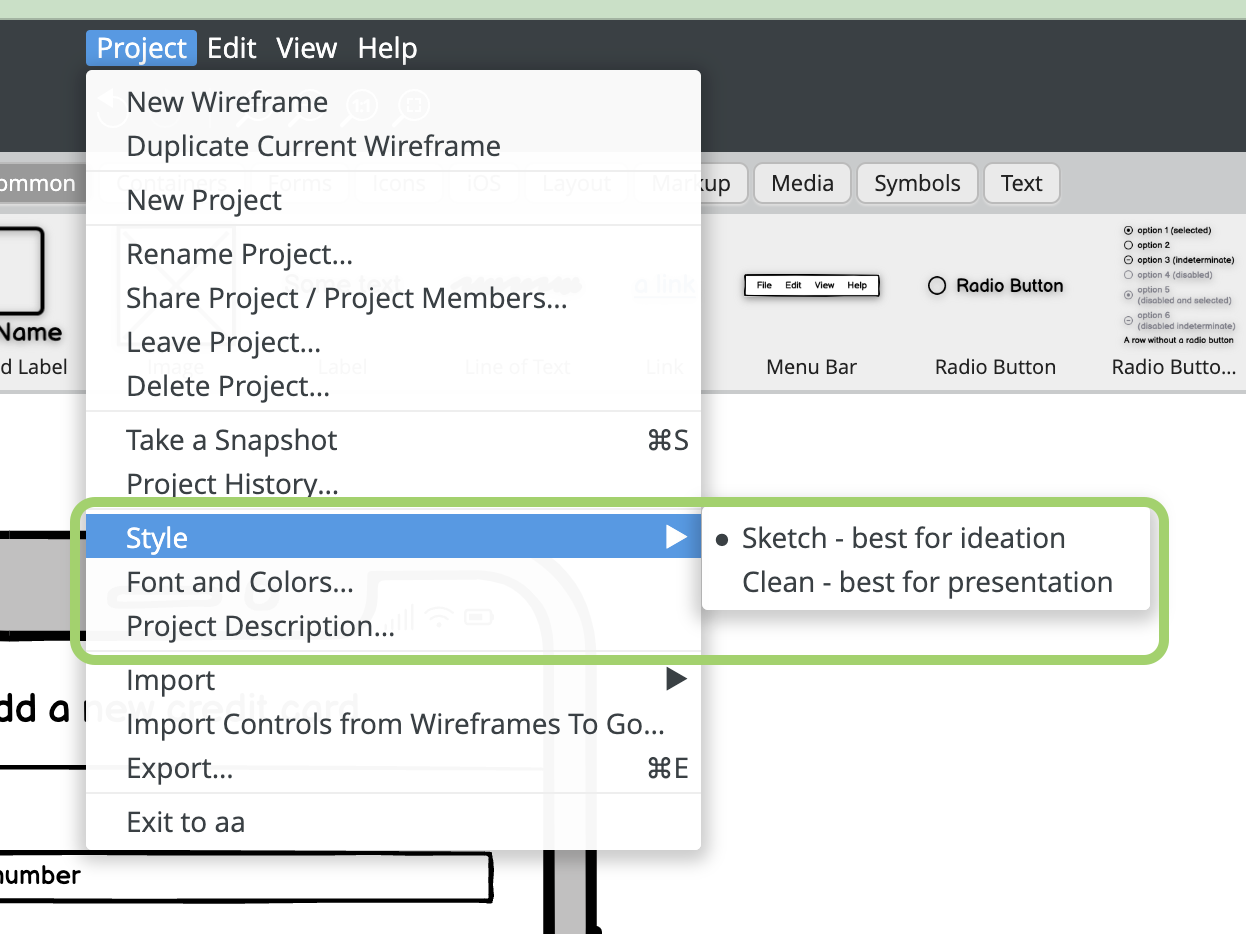
Other Tools
- Balsamiq Wireframes for Desktop: If you prefer to use the desktop version of Balsamiq, check your email for an exclusive extended trial offer.
- Tools not used in this course: Omnigraffle, Axure, Go Mockingbird, and UXPin
[MUSIC]
0:00
Now that you know to
draw wireframes on paper,
0:04
let's explore how to create
wireframes on a computer.
0:07
Balsamiq is a tool built specifically for
wireframing.
0:11
It contains UI elements and
0:14
devices that can easily be inserted
as building blocks for a wireframe.
0:16
You can either use Balsamiq Cloud
in the browser, or
0:21
download the Balsamiq desktop app.
0:25
Cloud is available free for 30 days.
0:27
And in the Teacher's Notes,
I put instructions for
0:30
how to extend it to a 60 day trial.
0:32
If you prefer to use the desktop app,
look in the Teacher's Notes for
0:35
a one year license key.
0:39
But keep in mind that some features
I demo in the cloud version
0:41
aren't available on the desktop app.
0:45
Alrighty, go ahead and get set up with
Balsamiq so you can follow along with me.
0:47
Go ahead and
open Basalmiq Cloud in a browser.
0:52
The URL is balsalmiq.cloud.
0:56
The initial screen will differ,
based on your account activity.
1:04
So click the smiley face icon to
navigate to the Spaces screen.
1:08
A space is a collection of projects.
1:14
If you haven't created one yet,
go ahead and click the + icon,
1:17
enter a name, And click Create My Space.
1:23
I already have a Space so
I'm gonna exit this window and
1:31
open My Space called Course Demo.
1:34
Next I'll show you how to
import the project file.
1:38
In the project files
attached to this video,
1:42
I've included my Balsamiq file so
you can follow along.
1:45
After you download the example file,
from the project screen,
1:48
click the Import button
in the top left corner.
1:53
Navigate to where you downloaded the
project file, and select it, click Open.
1:56
Now you're able to see the project,
click to open it.
2:05
Feel free to take a peek at
this file to get a sense for
2:11
how wireframes look in Balsamiq.
2:15
Great, now let's create
a wireframe from scratch.
2:20
Click to the Spaces screen.
2:24
For me, my space is called Course Demo.
2:26
So I'll just click that in the top nav.
2:29
Click the plus icon to
create a new project.
2:33
Let's get familiar with the UI.
2:38
Right now we're mainly
looking at the blank canvas.
2:41
This white area's where
elements can be placed.
2:46
On the left is the navigator panel.
2:49
This is where you can toggle
between the different wireframes.
2:52
At the top is the UI library which is
where UI elements can be dragged onto
2:56
the canvas.
3:01
At the top is a toolbar which shows the
sections of elements in the UI library.
3:03
A couple of handy panels
can appear on the right.
3:09
The info icon shows the inspector panel.
3:13
This is where you can add notes and
alternate versions.
3:16
When the inspector panel is visible and
3:21
you also have an element selected, you'll
be able to edit its properties there.
3:24
The icon that looks like a document
controls the project info panel.
3:30
In this panel, you can change
the overall project settings.
3:34
Now, just to get acquainted with the tool,
let's pretend we're making an iPhone app.
3:39
I like listening to podcast.
3:45
So I'm gonna put together a basic
screen that shows a podcast episode.
3:47
FIrst, you'll want to start
out by choosing the container.
3:52
Click Containers, and
drag an iPhone to the screen.
3:55
The UI library contains a bunch
of drag and drop UI elements.
4:00
The common section is a great place to
see the most frequently used elements.
4:06
At the top,
I wanna include a navigation bar.
4:13
Instead of scrolling through
the UI library, I like to use
4:17
quick add which basically allows us
to search the library by keyword.
4:21
We'll need a back arrow in the navigation.
4:26
You can click into the Quick Add search
bar or you can use a keyboard shortcut.
4:29
Just type a forward slash
on your keyboard, and
4:36
your cursor will appear in
the Quick Add search bar.
4:39
Type angle, and choose the left one.
4:42
Place it where you want it,
typically in the top left of the screen.
4:51
It's a little big.
4:56
So I'm gonna go over here to the info
panel and I'm gonna make it smaller.
4:57
I'm gonna make it medium sized.
5:01
Now drag a line of text to this screen.
5:06
This will represent
the title of the podcast.
5:08
Now I want an image of
the podcast at the top.
5:13
Drag image onto the canvas.
5:16
Resize it by clicking one of the corners
and dragging it to the preferred size.
5:19
I'm gonna make this one sized to fit
full width at the top of the screen.
5:24
Now I'm gonna add a line of text.
5:36
This will represent a headline.
5:38
Under that I'm gonna add a block
of text which might have
5:45
a description of the podcast episode.
5:49
I'm gonna make it a little wider so
that way it spans across the device more.
5:54
Finally, let's add a button so
users can play the episode.
5:59
Drag button onto the canvas.
6:03
Double click it to change the button text.
6:11
And then click enter when you're done.
6:18
Great, I'm gonna make it a little
bigger so it's easier to click on.
6:22
And I also wanna add an icon.
6:25
On the right here,
there's an icon section.
6:29
Search for play,
I wanna add a play button.
6:32
Great, I'm gonna make it a little wider,
so
6:38
that way it looks a little
bit more balanced.
6:40
And I think the icon's a little too
big here in proportion to the text.
6:44
So let's make the icon extra small.
6:48
Great, now we have a basic wireframe.
6:52
Just so that you can see more
of my canvas, I'm going to hide
6:56
the UI library by going to View and
then unchecking UI Library.
7:01
If you don't like the stytle of
the wireframe, you have options.
7:08
In the top right of Balsamiq,
click the project info icon.
7:12
Now you'll see a panel of
Project Information on the right.
7:17
For skin, choose wireframe.
7:21
As you can see,
this is more of a technical rendering.
7:25
I'm gonna stick with the wireframe skin,
since I like how neat it looks.
7:28
When you choose a skin, you can do so
based on your personal preference
7:32
or you can strategically
choose the sketch style
7:38
to communicate to stakeholders this
is your loose brainstorm type sketch.
7:43
And then switch to the wireframe skin
7:49
when it's time to present a more
finalized version to outside clients.
7:51
On the panel,
you can also adjust the font.
7:57
I'm gonna switch to the Lato font.
8:00
You can also change the font size and
colors, but
8:04
I'm gonna stick with the defaults.
8:08
We're going to move on to
another wireframe now, but
8:10
before leaving this one,
let's give it a descriptive name.
8:13
Click the down arrow on the thumbnail and
choose Rename.
8:17
I'm gonna call it
Podcast App Episode Details and
8:23
click Rename.
8:32
Now that you're more familiar with
Balsamiq, let's get back to our ride
8:34
sharing app project for
a fictional company called Ride.
8:39
You need to sign up for Treehouse in order to download course files.
Sign up