Welcome to the Treehouse Community
Want to collaborate on code errors? Have bugs you need feedback on? Looking for an extra set of eyes on your latest project? Get support with fellow developers, designers, and programmers of all backgrounds and skill levels here with the Treehouse Community! While you're at it, check out some resources Treehouse students have shared here.
Looking to learn something new?
Treehouse offers a seven day free trial for new students. Get access to thousands of hours of content and join thousands of Treehouse students and alumni in the community today.
Start your free trial
Ragesh Kanagaraj
3,637 PointsNot able to find Swipe type Navigation in Android Studio
Hi , I tried to follow up with this tutorial in the same way I did earlier for the previous ones. While creating the project I did not find Navigation type drop down at all. Post creation of the project my main Activity looks like a blank Activity, I am stuck here completely, even If i google for this issue, I might find a solution but I might not understand the exact problem faced.
I have attached my code snippet or MainActivity.java and the layout code as well.
    import java.util.Locale;

    import android.support.v4.app.FragmentActivity;
    import android.support.v7.app.ActionBarActivity;
    import android.support.v7.app.ActionBar;
    import android.support.v4.app.Fragment;
    import android.support.v4.app.FragmentManager;
    import android.support.v4.app.FragmentTransaction;
    import android.support.v4.app.FragmentPagerAdapter;
    import android.os.Bundle;
    import android.support.v4.view.ViewPager;
    import android.view.Gravity;
    import android.view.LayoutInflater;
    import android.view.Menu;
    import android.view.MenuItem;
    import android.view.View;
    import android.view.ViewGroup;
    import android.widget.TextView;


    public class MainActivity extends FragmentActivity{

    /**
     * The {@link android.support.v4.view.PagerAdapter} that will provide
     * fragments for each of the sections. We use a
     * {@link FragmentPagerAdapter} derivative, which will keep every
     * loaded fragment in memory. If this becomes too memory intensive, it
     * may be best to switch to a
     * {@link android.support.v4.app.FragmentStatePagerAdapter}.
     */
    SectionsPagerAdapter mSectionsPagerAdapter;

    /**
     * The {@link ViewPager} that will host the section contents.
     */
    ViewPager mViewPager;

    @Override
    protected void onCreate(Bundle savedInstanceState) {
        super.onCreate(savedInstanceState);
        setContentView(R.layout.activity_main);


        // Create the adapter that will return a fragment for each of the three
        // primary sections of the activity.
        mSectionsPagerAdapter = new SectionsPagerAdapter(getSupportFragmentManager());

        // Set up the ViewPager with the sections adapter.
        mViewPager = (ViewPager) findViewById(R.id.pager);
        mViewPager.setAdapter(mSectionsPagerAdapter);

    }


    @Override
    public boolean onCreateOptionsMenu(Menu menu) {
        // Inflate the menu; this adds items to the action bar if it is present.
        getMenuInflater().inflate(R.menu.menu_main, menu);
        return true;
    }

    @Override
    public boolean onOptionsItemSelected(MenuItem item) {
        // Handle action bar item clicks here. The action bar will
        // automatically handle clicks on the Home/Up button, so long
        // as you specify a parent activity in AndroidManifest.xml.
        int id = item.getItemId();

        //noinspection SimplifiableIfStatement
        if (id == R.id.action_settings) {
            return true;
        }

        return super.onOptionsItemSelected(item);
    }


    /**
     * A {@link FragmentPagerAdapter} that returns a fragment corresponding to
     * one of the sections/tabs/pages.
     */
    public class SectionsPagerAdapter extends FragmentPagerAdapter {

        public SectionsPagerAdapter(FragmentManager fm) {
            super(fm);
        }

        @Override
        public Fragment getItem(int position) {
            // getItem is called to instantiate the fragment for the given page.
            // Return a PlaceholderFragment (defined as a static inner class below).
            return PlaceholderFragment.newInstance(position + 1);
        }

        @Override
        public int getCount() {
            // Show 3 total pages.
            return 3;
        }

        @Override
        public CharSequence getPageTitle(int position) {
            Locale l = Locale.getDefault();
            switch (position) {
                case 0:
                    return getString(R.string.title_section1).toUpperCase(l);
                case 1:
                    return getString(R.string.title_section2).toUpperCase(l);
                case 2:
                    return getString(R.string.title_section3).toUpperCase(l);
            }
            return null;
        }
    }

    /**
     * A placeholder fragment containing a simple view.
     */
    public static class PlaceholderFragment extends Fragment {
        /**
         * The fragment argument representing the section number for this
         * fragment.
         */
        private static final String ARG_SECTION_NUMBER = "section_number";

        /**
         * Returns a new instance of this fragment for the given section
         * number.
         */
        public static PlaceholderFragment newInstance(int sectionNumber) {
            PlaceholderFragment fragment = new PlaceholderFragment();
            Bundle args = new Bundle();
            args.putInt(ARG_SECTION_NUMBER, sectionNumber);
            fragment.setArguments(args);
            return fragment;
        }

        public PlaceholderFragment() {
        }

        @Override
        public View onCreateView(LayoutInflater inflater, ViewGroup container,
                                 Bundle savedInstanceState) {
            View rootView = inflater.inflate(R.layout.fragment_main, container, false);
            return rootView;
        }
    }

}
                                <android.support.v4.view.ViewPager xmlns:android="http://schemas.android.com/apk/res/android"
                                   xmlns:tools="http://schemas.android.com/tools"
                                   android:id="@+id/pager"
                                   android:layout_width="match_parent"
                                   android:layout_height="match_parent"
                                   tools:context=".MainActivity"/>

fragment_main.xml

      <RelativeLayout xmlns:android="http://schemas.android.com/apk/res/android"
                xmlns:tools="http://schemas.android.com/tools"
                android:layout_width="match_parent"
                android:layout_height="match_parent"
                android:paddingLeft="@dimen/activity_horizontal_margin"
                android:paddingRight="@dimen/activity_horizontal_margin"
                android:paddingTop="@dimen/activity_vertical_margin"
                android:paddingBottom="@dimen/activity_vertical_margin"
                tools:context=".MainActivity$PlaceholderFragment">

       <TextView
        android:id="@+id/section_label"
        android:layout_width="wrap_content"
        android:layout_height="wrap_content"/>

      </RelativeLayout>
1 Answer
Harry James
14,780 PointsHey Ragesh!
To add the tabs on the top, simply add these two lines to the end of onCreate():
TabLayout tabLayout = (TabLayout) findViewById(R.id.tabs);
tabLayout.setupWithViewPager(mViewPager);
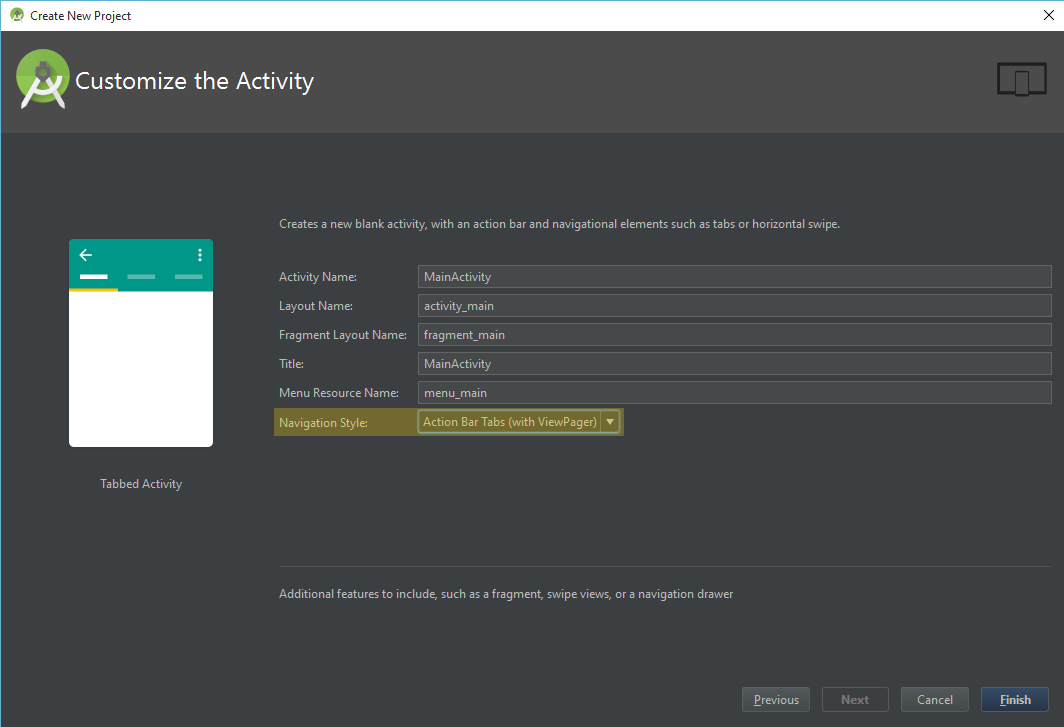
In the future, you can create a new project with these tabs by creating a Tabbed Activity, like you have done here but then on the next screen setting the Navigation Style to Action Bar Tabs (with ViewPager):
Hope it helps and if you have any problems after doing this, give me a shout and I'll be happy to help out :)

Unsubscribed User
14,189 PointsUnsubscribed User
14,189 PointsActually, I tried that, but that option contains a bunch of deprecated code as well... most of the tab code was deprecated with version 21. Not sure why.
Harry James
14,780 PointsHarry James
14,780 PointsHey Wilson Gardner,
Make sure you're using the latest version of Android Studio when doing this! Otherwise, a lot of the tab code may be deprecated (You're probably getting ActionBar rather than Toolbar).
To do this, go to Help >> Check for Update.
Hope it helps :)