Well done!
You have completed Learning with Coda!
You have completed Learning with Coda!
Learn some of the different ways you can view data in tables. With Coda, it's easy to dynamically add color to a cell or row to highlight different data types, depending on specific values that show up in the table.
Resources
- Conditional format | Coda Essentials
- Connect your doc with Packs
- Using Coda Packs
- Packs | Coda Essentials
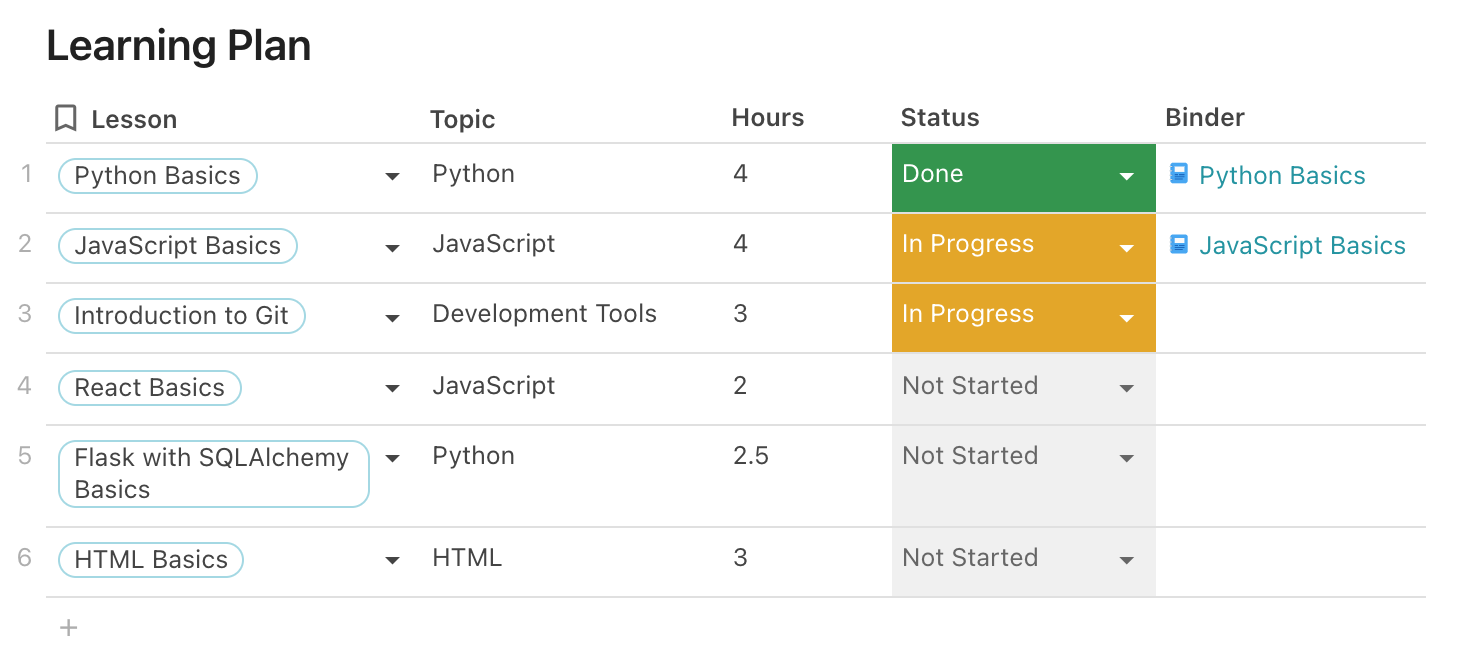
Display other data from the "Lessons" table in your "Learning Plan" table
- Click the + icon to add a new column to the Learning Plan Table. Leave the data type as the default, "T" – or text.
- Name the new column – for example, "Hours".
- Click the "T" data type icon in the new column header, then select "Add formula" from the list.
- To pull display other attributes of a lesson in your new column, type "Lesson" into the "Add column formula" field.
- The following formulas display other types of data in your column:
-
Lesson.Est Hours– Est Hours -
Lesson.Treehouse Link– Treehouse Link
-
Your "Learning Plan" table displaying the new data should look similar to the table below:
Related Discussions
Have questions about this video? Start a discussion with the community and Treehouse staff.
Sign upRelated Discussions
Have questions about this video? Start a discussion with the community and Treehouse staff.
Sign upYou've just learned how easy it is to manage and 0:00 look up data from multiple tables in Coda. 0:03 Next, I'll show you several different ways you can view data in tables. 0:06 With Coda, it's easy to dynamically add color to a cell or row to highlight 0:10 different types of data depending on specific values that show up in the table. 0:15 You've already had a sneak peek of how conditional formatting works in 0:20 a previous Coda workshop. 0:23 Now I'm going to give you an opportunity to try it out for yourself. 0:25 You'll start by customizing your learning plan so that when you select Done in 0:29 the Status column, the background color of the Done cell will turn green. 0:33 When you select In Progress, it'll turn yellow, and 0:38 if you choose Not Started, it'll turn light gray. 0:41 All right, go to your Treehouse Workbook now and 0:45 select the My Student Planner page. 0:48 Hover over to the right of the Lesson column and 0:52 click on the column header to view the lookup type options. 0:55 Notice how the lesson drop down list options are being pulled from 0:59 another table called Lessons on the Admin & Data page. 1:04 Here are all the lessons, each has a title, 1:09 topic, Treehouse link, and the estimated time in hours. 1:12 You can view all this data in the Learning Plan table when you hover over a lesson. 1:17 Now, hover over to the right of the Status column header and 1:27 click the select list data type icon to view the select list data type options. 1:32 Notice how the status options aren't being pulled from another table like the lesson 1:39 options were. 1:44 Instead, they've been manually listed here as options separated by commas. 1:45 So we have Not Started, In Progress, and Done. 1:51 Back in the select list data type drop down, go to Format, 1:58 then select Conditional format, and you'll see a list of all 2:02 the status options such as Not Started, In Progress, and Done. 2:07 We're going to customize this table so that whenever you select a status, 2:13 this cell displays the color you've specified. 2:17 Let's set this up now. 2:20 So first, if status is Done, 2:21 I'll make the background of the cell green. 2:25 I'll duplicate this, and here, 2:34 I'll say if status is In Progress, 2:38 I'll make the background of the cell yellow. 2:42 I'll duplicate it again, and here I'll select Not Started, 2:49 and if status is Not Started, I'll make the cell light gray. 2:56 Conditional formatting lets you not only change the color, but 3:06 also the text style as well. 3:10 It's a great way to highlight data presented in a table based on specific 3:12 conditions. 3:16 To extend, the power of a table like this, Coda also lets you add automations with 3:23 packs that are triggered by conditions, such as changes to values in a row. 3:29 So in our example here, each time the status changes to Done, 3:34 you can use the Gmail or Slack packs to configure Coda to notify someone to let 3:38 them know via email or Slack, for example. 3:43 I've posted resources about Coda packs in the teacher's notes with this video. 3:46 Up next, 3:50 I'll show you how to hide the amount of data you want to display in a table. 3:51
You need to sign up for Treehouse in order to download course files.
Sign upYou need to sign up for Treehouse in order to set up Workspace
Sign up