This course will be retired on July 14, 2025.
Heads up! To view this whole video, sign in with your Courses account or enroll in your free 7-day trial. Sign In Enroll
Preview
Video Player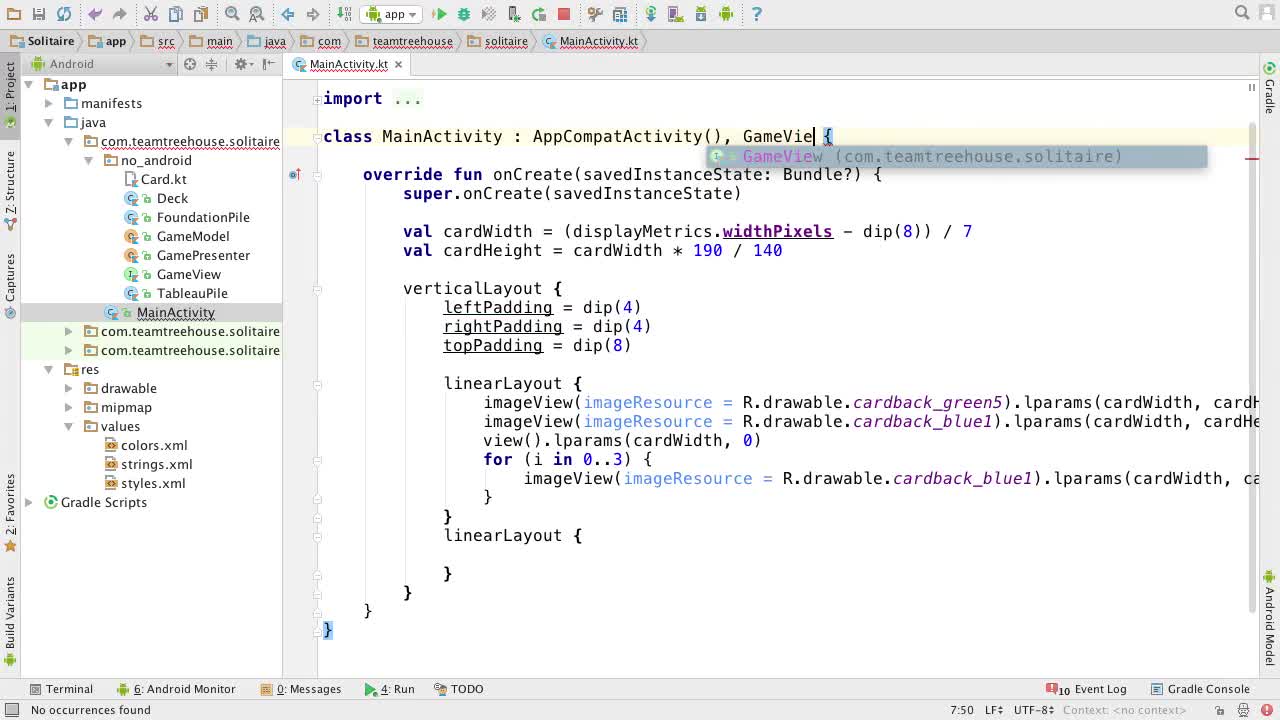
00:00
00:00
00:00
- 2x 2x
- 1.75x 1.75x
- 1.5x 1.5x
- 1.25x 1.25x
- 1.1x 1.1x
- 1x 1x
- 0.75x 0.75x
- 0.5x 0.5x
In this video we see what it takes to create custom Views with Anko!
Related Discussions
Have questions about this video? Start a discussion with the community and Treehouse staff.
Sign upRelated Discussions
Have questions about this video? Start a discussion with the community and Treehouse staff.
Sign up
We've got all the code we need and
0:00
we've got a pretty good understanding
of how we're building up the layout.
0:02
So I say,
it's time we start playing some solitaire.
0:05
The first thing we need to do is,
implement GameView.
0:09
Right now, we've got our game
presenter updating our game view but
0:12
we don't have any actual game views.
0:16
We've just got the interface.
0:18
To implement this interface
at the top of main activity.
0:20
Add a comma after app compact activity and
its parenthesis and then type game view.
0:24
Then lets use alt enter to
implement the update method.
0:31
And I'd prefer it below on create,
so I'm going to move it.
0:39
Now that we've got our game view, we need
to tell our game presenter that it exists.
0:48
At the top of onCreate,
below the call to a super.
0:53
let's add some space and
0:56
then call it GamePresenter.setGameView and
pass and this.
0:58
Remember GamePresenter is a singleton.
1:06
So we don't need to create an instance
of it, we can just use it.
1:08
Then on the next line, let's set
up the game by calling GameModel,
1:12
.resetGame and now,
we're ready to start playing.
1:19
Let's start with the deck.
1:23
Right now, it's just an imageView
with a green card, and
1:25
when we tap on it, nothing happens.
1:29
But we'll fix that and rather than
adding the on click listener here.
1:32
Let's instead,
make a custom view for our deck.
1:36
Let's create a new class named DeckView.
1:40
And then,
let's make this class extend ImageView.
1:49
Then, it tells us that this
type has a constructor and
1:57
thus must be initialized here.
2:01
So, let's use Alt Enter to
add the constructor and
2:05
then, we need to pass in a context.
2:09
Which means deck view needs to take in
a context, so let's add parenthesis for
2:12
our DeckView and then,
add a context parameter.
2:17
And finally, let's pass that
context into ImageView constructor.
2:24
Nice.
2:31
Next, I'm going to get rid of that
line minimize the imports and then,
2:32
head into DeckView.
2:37
Inside deck view,
let's start by adding in an init block.
2:40
And inside this init block,
let's set imageResource
2:46
= to R.drawable.cardback_green5.
2:51
And then,
let's add the on click listener, onClick.
2:55
But before we get to the onClick listener,
3:02
let's stop repeating ourselves
with these resource ids.
3:05
Over the main activity,
3:09
let's create a new package level
variables to store the resources we need.
3:10
Let's add a couple of
lines above the class and
3:15
then declare a new
Var Named cardBackDrawable.
3:21
And set it = to R.drawable.cardback_green5
and on the next line.
3:28
Let's declare another new val
named emptyPileDrawable and
3:35
set a=R.drawable.cardback_blue1, awesome.
3:41
Now, let's use these new properties
instead of what we've been using.
3:47
An emptyPileDrawable will go here and
here.
4:00
Then, we've just got to grab
another cardback drawable.
4:06
And over in deck view, we'll use
that instead of cardback green five.
4:09
Back inside our deck
views on click listener,
4:15
since this will be a click on the deck.
4:18
We need to call on deck
tap on our game presenter.
4:20
Normally, a game presenter object would be
passed in as a parameter to our deck view.
4:24
But since our game
presenter is a singleton,
4:29
we don't have much reason to do that here.
4:32
So, let's just call
GamePresenter.onDeckTap and
4:35
call it a day other
than the unit function.
4:40
We should also declare
an update function to
4:43
update our DeckView to match
what's going on with the model.
4:46
Let's start by declaring the function,
fun update and then brackets.
4:49
Inside this function,
4:58
we need to either show the card back
trouble if there are cards in the deck.
4:59
Or else we need to show
the empty pile drawable.
5:04
Let's first create a new
property named cards, And
5:07
set it equal to gameModel.deck.cardInDeck.
5:13
Then on the next line.
5:20
let's set image resource equal to.
5:22
If cards dot size is greater than zero
5:27
then we want this to be
the card back drawble.
5:33
Otherwise, let's set it equal
to the empty pile drawable.
5:38
Nice.
5:43
At this point we've completely
finished our DeckView class.
5:45
So, let's get back to main activity and
use it.
5:48
Let's delete the line that
used to be our DeckView, And
5:52
instead, let's just type DeckView and
5:59
pass in the context.
6:04
Now, if we run the app again.
6:07
Our DeckView is completely missing.
6:11
Remember, all these other views end
up eventually calling the anchor view
6:14
function.
6:18
And adding themselves to the way out.
6:19
All we did here was create a DeckView.
6:21
It hasn't been added to anything.
6:25
To fix this, we need our deck view
to end up calling N.K.O. view.
6:27
So, let's head back toward our
deck view and see what we can do.
6:32
To get this to end up calling N.K.O. view.
6:36
We're going to do the same thing
that all the other N.K.O. views do.
6:38
Below our deck view class,
let's add a couple of lines.
6:42
And then,
create the deck view factory constant.
6:45
Then, let's set this constant
equal to a lambda expression
6:52
that takes in a context,
And returns a new DeckView.
6:58
Then on the next line, let's declare a new
7:11
extension function on
ViewManager named deckView.
7:14
And import ViewManager and
7:21
in to this function,
we're going to pass another function.
7:24
Which will call init and its type
will be an extension function on dec
7:28
view which returns a unit.
7:34
Let's also give this a default
value of an empty function, so
7:41
we don't always have to specify it.
7:45
Then, let's set this equal to and
7:48
I'm going to do this on the next line
because I'm running out of room.
7:50
NKO view, pass in our deck
view factory for the factory.
7:54
Pass in zero for the theme and pass our in
our unit parameter as the unit parameter.
8:00
Back in main activity,
let's get rid of our deck few instance and
8:08
instead call our new deck
view extension function.
8:12
And since we don't have anything
extra to add to the init function,
8:17
let's use the parentheses
version instead of brackets.
8:20
Then let's add a call to l params And
add our cardWidth, and our cardHeight.
8:25
Then let's run the app and hopefully,
it'll still have a complete first row.
8:34
Awesome.
8:40
We've just created our first
custom view and angle.
8:42
We were able to add it to our
layout with only one line of code.
8:45
This is what Anko and
Kotlin can do for us.
8:49
They simplify the code we need to write.
8:52
And make it feel a lot more like you're
working on implementing features
8:54
that fighting with
unnecessary boilerplate code.
8:57
And the next video will implement
some of these features,
8:59
starting with the update function.
9:03
You need to sign up for Treehouse in order to download course files.
Sign upYou need to sign up for Treehouse in order to set up Workspace
Sign up