This course will be retired on July 14, 2025.
Heads up! To view this whole video, sign in with your Courses account or enroll in your free 7-day trial. Sign In Enroll
Preview
Video Player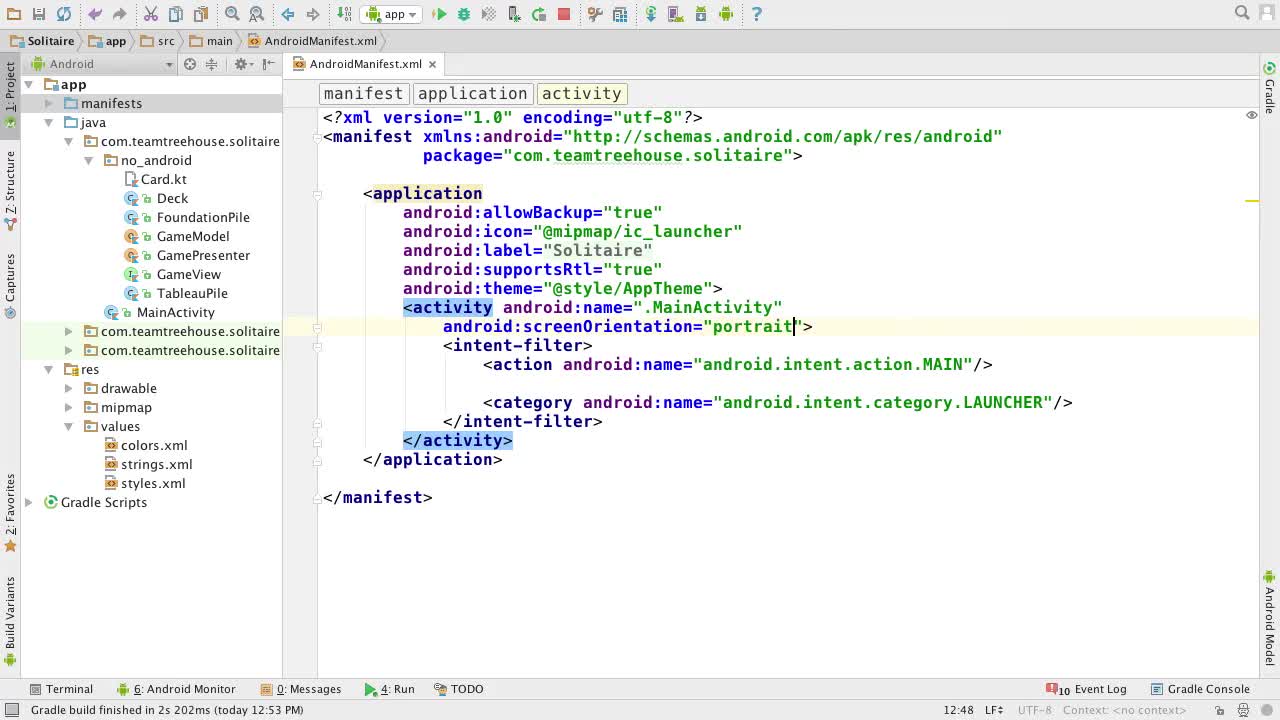
00:00
00:00
00:00
- 2x 2x
- 1.75x 1.75x
- 1.5x 1.5x
- 1.25x 1.25x
- 1.1x 1.1x
- 1x 1x
- 0.75x 0.75x
- 0.5x 0.5x
In this video we start layout out our solitaire app!
Related Discussions
Have questions about this video? Start a discussion with the community and Treehouse staff.
Sign upRelated Discussions
Have questions about this video? Start a discussion with the community and Treehouse staff.
Sign up
It's about time that we start putting our
hard earned Anko knowledge to good use.
0:00
But before we get back to main activity,
0:04
let's take a quick detour
to our manifest file.
0:07
Solitaire doesn't really work as well
in a landscape layout as it does
0:11
in a portrait layout.
0:14
So let's restrict our app to only
use a portrait layout by adding
0:16
the android:screenOrientation
tag to our activity.
0:20
And giving it a value of portrait.
0:26
All right, now let's close this and
open back up MainActivity.
0:30
To create the layout,
we'll be using one vertical linearLayout.
0:37
And inside that layout will
be one linearLayout for
0:41
the stock, waste pile, and foundations.
0:45
And another linearLayout for
the tableau piles.
0:48
So inside the onCreate method,
0:51
let's start by calling the verticalLayout
function and picking the brackets option.
0:53
verticalLayout is just a convenience
method from Anko which creates a linear
0:59
layout, but with the orientation
property already set to vertical.
1:04
Next, inside our verticalLayout,
let's add two linearLayouts.
1:09
And now we just need to add in
all the views for our game.
1:21
But before we can do that, we need
to know how big to make these views.
1:24
Which means we need to know how big
a card should be on the screen.
1:29
Let's start by figuring
out the width of a card.
1:34
[SOUND] From playing solitaire, we know
that we're going to need seven columns.
1:36
So we could just use the width
of the screen divided by seven,
1:41
but that doesn't leave us any space on
the sides, so it wouldn't look very good.
1:45
Instead, let's give room for
four dp's on each side,
1:49
which means the width
of a card ends up being
1:54
the width of the screen
minus eight dp divided by 7.
1:58
Let's add some space after
the super.onCreate call and
2:02
then create a new val named cardWidth.
2:07
And let's set it equal to, in parentheses,
2:10
displayMetrics.widthPixels- dip
2:17
function call, passing in 8,
2:23
and then at the end divided by 7.
2:27
Here, display metrics is just another
Anko shortcut that lets us get
2:32
directly to the relevant
displayMetrics object.
2:37
And the dip function,
as you might have guessed,
2:40
takes in density independent pixels and
turns them into regular pixels.
2:44
So this is essentially just 8 dp.
2:49
Now that we've got our card width we
just need to get our card height.
2:52
And we will need to base our card
height off of our card width,
2:56
to make sure that we keep the same
ratio between width and height.
3:00
To figure out what this ratio is,
3:04
let's open up our drawable folder and
then just open one of the images.
3:06
They should all be the same size.
3:11
So it looks like a card is 140
pixels wide by 190 pixels tall.
3:14
Now let's close this card file,
and back in mainActivity,
3:20
let's create another new
val named cardHeight.
3:26
And let's set it equal to card width
3:30
times 190 divided by 140.
3:36
Awesome, in the next video,
3:41
we'll use these new properties to layout
the first row of our solitaire game.
3:43
You need to sign up for Treehouse in order to download course files.
Sign upYou need to sign up for Treehouse in order to set up Workspace
Sign up